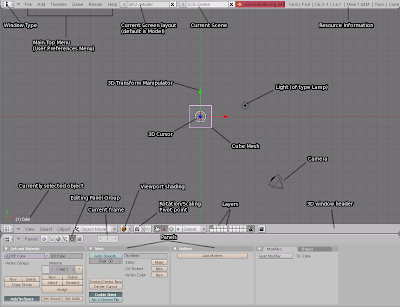
Just after opening Blender you get this in your screen:
 That's Blender's interface, but don't worry: there are only a couple of things to know about in there. The first thing you need to know is how to use the windows system of Blender:
- This is the 3D view window. You can switch the current view by pressing the lower left corner icon and selecting the desired view, but you shouldn't care about it right now.

- Below there is the buttons window, which will always show you the available options for the current job.
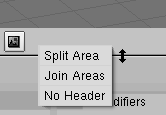
- You can right click on a border side and select split to split a window in two: right click on a side (left,right) border to split the window horizontally, or right click the up/down border to split the window vertically.

- The cube you see in the middle is the default mesh (3D object) that Blender creates for you when starting a new model. Later on you will be able to add more meshes.
- Pressing the middle mouse button (scroll wheel) and moving the mouse around without releasing it will rotate your point of view around the mesh. Move it slowly so you can easily understand the effect.
- Now repeat the operation (middle button dragging) while pressing the Shift key: that will move (not rotate, note the difference) your point of view along an axis.
- Note the blue, red and green lines in the window (also the arrows). These are the space axis: the red one is the X axis, the green one is the Y axis, and the blue one is the Z axis. You can think of «length» for X, «width» for Y, and «height» for the Z axis if you feel more comfortable with those.
- Press the TAB key: that will activate the Edit Mode. Press TAB key again to return to Object Mode.


- While in edit mode you can change the selection method by clicking the buttons (see picture) or by hitting Ctrl+TAB and selecting the option in the menu. You can change between vertex, edge and face selection method. These are the three ways you will use to modify an object from now on, so keep them in mind.


- If you aren't in Edit Mode hit TAB to enter Edit Mode. Now press the vertex selection method button. Left click on a vertex to select it. Shift+Click to select multiple vertex. Now press the edge selection method button, and select one and multiple edges. Do the same for faces.
 Now you have seen the object basis, and how to enter in Edit Mode. You will only be able to modify an object's vertex, edges and faces while in Edit Mode, not in Object Mode.
 - Now hit Space and select Add, Mesh and Cube. A second cube will be added to the 3D view window.
- To delete an object, right click it in Object Mode and press Del.
- Now try to delete all cubes if you have any, and add a Cilynder by hitting Space and selecting Add, Mesh and Cilynder. Now repeat this tutorial with the cilynder.
Now let's make a final summary. These are the things you should learn and remember:
- Windows: what is the 3D window and how to split windows.
- 3D view: how to navigate through the 3D view window.
- Edit Mode: how to enter Edit Mode and what it is.
- Selection methods: which elements of an object you can deal with: vertexs, edges and faces.
- Meshes: Adding and removing objects to your 3D view window.
No comments:
Post a Comment