Wednesday, April 28, 2010

Blender basics II: Basic Modelling

In this second chapter I will explain the most basic operations we can apply to meshes, vertexs, edges and faces. These operations will allow us to give the model the shape that we want.

Grab

The first operation we will see is the grab operation. It allows us to move a mesh in object mode, or a vertex/edge/face in edit mode.
  • Object mode: Select an object and press "g". The object will enter in grab mode, and can be moved by moving the mouse around the 3D view window.
  • Edit mode: Select a vertex/edge/face and press "g". The selected item will enter in grab mode, and only that vertex/edge/face will be moved, modifying the surrounding edges and faces.
  • In both modes, press left mouse button (or enter) to accept the new position and exit grab mode, or right mouse button (or escape) to exit grab mode without saving changes.
In both modes you can select multiple elements to move them together. There are also some advanced tricks for grab. Try the following:
  • Select an element in object or edit mode.
  • Press "g" to enter grab mode.
  • Press "x" to force the grab mode along the X Axis.
  • Move the mouse around to see how the object moves.
As result, you should see how the object moves along the X Axis, but not along Z and Y Axis. Try it also using keys "y" and "z" instead of "x", to grab the object along Z and Y Axis.

After the axis key, you can also enter a number to move the object by an exact amount of units.

Scale

The second operation we will see is the scale operation. It allows us to resize a mesh in object mode, or a vertex/edge/face in edit mode, taking as reference the current cursor position (if you don't change it, it will be the "middle" of the object). This works in a very similar way than the grab operation.
  • Free scale: Select element, press "s" key to enter scale mode, and move the mouse around to see the scaling effect.
  • Fixed axis scale: Select element, press "s" key to enter scale mode, press an axis key ("x", "y" or "z"), and move the mouse along the axis to see the scaling effect.
  • Fixed axis and amount scale: Select element, press "s" key to enter scale mode, press an axis key ("x", "y" or "z"), and enter a number to scale the element along the selected axis for the selected amount.
  • To exit scale mode, press left mouse button (or enter) to accept changes, or press right mouse button (or escape) to cancel changes.
Rotate

The third and last operation we will see is the rotate operation. It allows us to rotate a mesh in object mode, or a vertex/edge/face in edit mode, around the current cursor position (if you don't change it, it will be the "middle" of the object). This works in a very similar way than the grab and scale operations.
  • Free rotate: Select element, press "r" key to enter rotate mode, and move the mouse around to see the rotation effect.
  • Fixed axis rotate: Select element, press "r" key to enter rotate mode, press an axis key ("x", "y" or "z"), and move the mouse around to see the rotation effect over the selected axis.
  • Fixed axis and amount rotate: Select element, press "r" key to enter rotate mode, press an axis key ("x", "y" or "z"), and enter a number of degrees to rotate the element along the selected axis for the selected number of degrees.
  • To exit rotate mode, press left mouse button (or enter) to accept changes, or press right mouse button (or escape) to cancel changes.
These are the three basic operations that you will have to learn until automation to make models and graphics with Blender. Just practice, and you will learn and memorize more and more things the more you practice them.

Monday, April 26, 2010

Blender basics I: Introduction

This is the first of five Blender articles I'm writing for Simutrans painters. I will explain here the main concepts and the most basic things you can find in Blender. If you still don't have Blender installed, get it here.

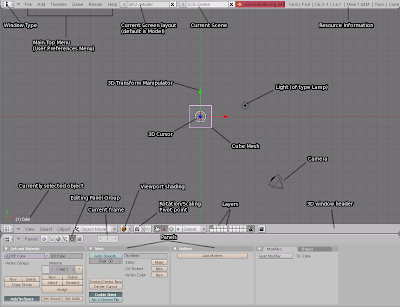
Just after opening Blender you get this in your screen: That's Blender's interface, but don't worry: there are only a couple of things to know about in there. The first thing you need to know is how to use the windows system of Blender:
  • This is the 3D view window. You can switch the current view by pressing the lower left corner icon and selecting the desired view, but you shouldn't care about it right now.
  • Below there is the buttons window, which will always show you the available options for the current job.
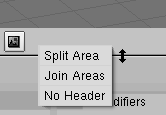
  • You can right click on a border side and select split to split a window in two: right click on a side (left,right) border to split the window horizontally, or right click the up/down border to split the window vertically.
Now that you know where you are, we can proceed to find out what you can do. The first of all is to get familiarized with the main window (you will work here most of the time), the 3D view window:
  • The cube you see in the middle is the default mesh (3D object) that Blender creates for you when starting a new model. Later on you will be able to add more meshes.
  • Pressing the middle mouse button (scroll wheel) and moving the mouse around without releasing it will rotate your point of view around the mesh. Move it slowly so you can easily understand the effect.
  • Now repeat the operation (middle button dragging) while pressing the Shift key: that will move (not rotate, note the difference) your point of view along an axis.
  • Note the blue, red and green lines in the window (also the arrows). These are the space axis: the red one is the X axis, the green one is the Y axis, and the blue one is the Z axis. You can think of «length» for X, «width» for Y, and «height» for the Z axis if you feel more comfortable with those.
Now you know most elements in the screen, so you can get a bit deeper on it:
  • Press the TAB key: that will activate the Edit Mode. Press TAB key again to return to Object Mode.
  • While in edit mode you can change the selection method by clicking the buttons (see picture) or by hitting Ctrl+TAB and selecting the option in the menu. You can change between vertex, edge and face selection method. These are the three ways you will use to modify an object from now on, so keep them in mind.
  • If you aren't in Edit Mode hit TAB to enter Edit Mode. Now press the vertex selection method button. Left click on a vertex to select it. Shift+Click to select multiple vertex. Now press the edge selection method button, and select one and multiple edges. Do the same for faces.
Now you have seen the object basis, and how to enter in Edit Mode. You will only be able to modify an object's vertex, edges and faces while in Edit Mode, not in Object Mode.
  • Now hit Space and select Add, Mesh and Cube. A second cube will be added to the 3D view window.
  • To delete an object, right click it in Object Mode and press Del.
  • Now try to delete all cubes if you have any, and add a Cilynder by hitting Space and selecting Add, Mesh and Cilynder. Now repeat this tutorial with the cilynder.


Now let's make a final summary. These are the things you should learn and remember:
  • Windows: what is the 3D window and how to split windows.
  • 3D view: how to navigate through the 3D view window.
  • Edit Mode: how to enter Edit Mode and what it is.
  • Selection methods: which elements of an object you can deal with: vertexs, edges and faces.
  • Meshes: Adding and removing objects to your 3D view window.

Blender and Simutrans

Blender is an open source 3D modelling software that I use to make graphics for Simutrans. This software allows you to build a 3D model, apply textures to it, and render images, which means taking pictures of the model.

Using a 3D software to make graphics for Simutrans has cons and pros. I will analyze them, despite as I've never painted using pixel-art techniques I can't guess many advantadges it may have over 3D software. Comments, advice and suggestions about both techniques will be appreciated.

Cons. There are mainly two reasons to not use 3D software:
  • You need to learn how to use a complex tool.
  • You need to practice/learn a different workflow for making graphics.
Pros. I can see many of them, some quite cool:
  • You can make basic changes to the model (e.g. rescaling) with relative ease.
  • You can easily re-use previous work (e.g., for different freights, even for other similar vehicles).
  • Models can be used for different paks, or shared with other paks' painters.
  • Lot of work can be automated (techniques, rendering, colouring...).
  • You work on a single 3D model, no matter the number of views needed.

In my oppinion, I understand those people who don't want to use 3D software due the difficulty on learning the new software. Actually I think it's not as difficult as it looks like, but I must admit it's not easy at all. By the way, I keep learning some basic techniques I didn't know after two years of using Blender!

The difficulty of learning how to use Blender is one of the reasons that encourages me to write this article and the ones that will folow. I'll try to build a collection of articles about small tricks, techniques and other short tutorials that can teach other people to use Blender step by step, based on small chapters that are easy to read and learn, with the intention of making easier to learn the whole.

So stay tuned, because I will write very soon the first chapter about Blender. It will be a very simple introduction to what is Blender and how does it look like.

Saturday, April 24, 2010

New locomotive: TGV La Poste

The TGV La Poste trainsets were built by Alstom between 1978 and 1986. These trains were essentially TGV-PSE half sets modified for postal service, consisting of a power car plus four mail cars. TGV-PSE no.38 trainset was refitted later on as two La Poste half trainsets. TGV La Poste sets are used to transport mail (initially between Paris and Lyon) by the french postal company La Poste. These are the fastest freight trains in the world, travelling at 270 km/h.

The real specifications for this vehicle are (taken from the Wikipedia):
  • Units built: 5 half trainsets, plus 2 reffited PSE no.38
  • Formation: 10 cars (2 heads + 8 cars)
  • Total length: 200 m
  • Total weight: 385 t
  • Top speed: 270 Km/h
  • Power output: 6450 kW
See some pictures at the Railfaneurope.net picture gallery.

This is a blender rendered output (click to enlarge) using its original colour scheme, and some in-game screenshots:

Blender renderized output


Simutrans screenshot


Simutrans object data:

TypeElectric Locomotive
NameTGV La PosteTGV La Poste Car A/B
FreightMail
Capacity080
Power3225 kW0 kW
Max.Speed270 Km/h
Intro Yearjune 1981
Retire YearN/A


The train has been coded into simutrans as the original sets, with a maximum speed of 270 Km/h and 6450 kW of power. They are available from june 1981 and the optimum in-game formation is 2 power cars and 4 to 6 mail cars (best graphical look is a Front-CarA-CarB-CarB-CarA-Back formation).

This train is meant to be part of a full TGV pakset, which I hope it will be released soon.

For more information on this locomotive check the following links:

Thursday, April 1, 2010

New locomotive: TGV Atlantique

The TGV Atlantique is the second generation of french high speed trains. They were built by Alstom between 1988 and 1991, and started running service in the LGV Atlantique (Paris to western France line). These trains have a capacity of 485 seats and run at a maximum speed of 300 Km/h.

The real specifications for this vehicle are (taken from the Wikipedia):
  • Units built: 105 trainsets
  • Formation: 12 cars (2 heads + 10 cars)
  • Total length: 237.50 m
  • Total weight: 444 t
  • Top speed: 300 Km/h
  • Power output: 8800 kW
See some pictures at the Railfaneurope.net picture gallery.

This is a blender rendered output (click to enlarge) using its original colour scheme, and some in-game screenshots:

Blender renderized output


Simutrans screenshot


Simutrans object data:

TypeElectric Locomotive
NameTGV AtlantiqueTGV Atlantique Car
FreightPassengers
Capacity049
Power4400 kW0 kW
Max.Speed300 Km/h
Intro Year1989
Retire YearN/A


The train has been coded into simutrans with its real specifications, that is, maximum speed of 300 Km/h and 8800 kW of power. They are available from 1989 and the optimum in-game formation is 2 power cars and 4 or 6 passenger cars.

This train is meant to be part of a full TGV pakset, which I hope it will be released soon.

For more information on this ship check the following links: