Continues from Part I
Practice is All
After the planes, I gave a try to several spanish locomotives, but I didn't sucess very much with those. I hadn't yet enough knowledge in blender, and it was difficult for me to get good results: most of them were just too boxy and/or sharp, and lightning wasn't good, either too much or too dark.
Then I started with ships, big ones. Slowly I was getting better using blender, and understood better how does it work. I begun to use oversampling to get more soft pictures, but I had to remove blurry edges by hand, which was like hell for me.
After several ships, I started to make some buildings using blender, some were successfull and other weren't. One of my best was the old-style fish cannery, which I still think it's really cute. I also used some image texturing (not UV) in blender, which consists in loading an image and use is as an internal texture; you can't adjust the texture to the shape that way, so it must be used on an object with the same texture in all of its surface.
This wasn't a very productive time, but I gained a lot of practice using blender and producing graphics for Simutrans with blender renders.
The Era of Automation
Then Hajo changed my life! Talking in the IRC chat room, he proposed me to use a mask to remove the blurry edges of my OSA renderings. Then I started to render twice my creations: making an oversampled render and a regular (mask) render; after that, I used the masks to remove blurry edges, which saved me lot of suffering. And that pushed me to automate my tasks: I decided to write a program to put all my renders together and apply those masks automatically for me.
Now I've been using this small program that I created for over a couple of years, and I can only say that my addons production has (at least) doubled. The amount of time that I need now to create a Simutrans addon having a blender model is about 15 minutes, when before it was between one and two hours. Not to mention that my ability with blender has been increasing a little more, and now it takes me half the time to create an acceptable 3D model.
The Pak128 ship set includes the very first objects created using those tools, specially the last objects in the set. So, it has been lots of things in not such a long time, as four years and a half means I'm still a kid in the comunity. I hope I can be still many years contributing to Simutrans, and enjoying it!
Showing posts with label blender. Show all posts
Showing posts with label blender. Show all posts
Sunday, January 13, 2013

Saturday, January 5, 2013
Painting for Simutrans: Evolution: Part 1
I've been for over four years and a half in the forum, and I feel it's time to take a look back and see who am I and where I did came from...
I discovered Simutrans on March 13, 2008; that's what my welcome message at the forum archive says. Since then, I've been playing a lot, more at the begining than now, but always enjoying this fantastic game.
My first creations
It took me about three months, until end of June, deciding to create content for Simutrans, where I started my airplane set for Pak128: that's two years and a half ago. Lots of things changed from those first contributions to the last ones I am currently developing, and I will talk about them!
At the very first, when I painted my first airplanes, I used only very basic capabilities in blender, as I was an absolute newbie to it. Moreover I used always UV mapping techniques, which consist on drawing images with an external tool (I used Photoshop most of the times), and then sticking them onto blender's objects surface. That gave my first vehicles a real-like style texturing, which I used to like very much.
During that first stage, I went from using only very square and sharp objects to use more cylinders and rounded objects. That can also be seen when you look at those airplanes: the Airbus series were one of the first ones, while 747 and the old W8B or the IL Candid are the last ones. There's a big difference between them, mostly in their shape and concept.
And Shades was right there...
The technique used to build simutrans objects in these days was rotating manually the objects in blender, in order to take the proper renderings. I made a first render to get the size of the object in pixels, then scale properly the object into blender. After that I had to render manually all eight views, then load all into my image editing software, manually align each view, and add special colors like windows or green/red lights. After half of my planes or more I discovered Shades (yes!), which made my life easier by aiding a lot with aligning and special colouring.
Will continue in part 2... soon.
I discovered Simutrans on March 13, 2008; that's what my welcome message at the forum archive says. Since then, I've been playing a lot, more at the begining than now, but always enjoying this fantastic game.
My first creations
It took me about three months, until end of June, deciding to create content for Simutrans, where I started my airplane set for Pak128: that's two years and a half ago. Lots of things changed from those first contributions to the last ones I am currently developing, and I will talk about them!
At the very first, when I painted my first airplanes, I used only very basic capabilities in blender, as I was an absolute newbie to it. Moreover I used always UV mapping techniques, which consist on drawing images with an external tool (I used Photoshop most of the times), and then sticking them onto blender's objects surface. That gave my first vehicles a real-like style texturing, which I used to like very much.
During that first stage, I went from using only very square and sharp objects to use more cylinders and rounded objects. That can also be seen when you look at those airplanes: the Airbus series were one of the first ones, while 747 and the old W8B or the IL Candid are the last ones. There's a big difference between them, mostly in their shape and concept.
And Shades was right there...
The technique used to build simutrans objects in these days was rotating manually the objects in blender, in order to take the proper renderings. I made a first render to get the size of the object in pixels, then scale properly the object into blender. After that I had to render manually all eight views, then load all into my image editing software, manually align each view, and add special colors like windows or green/red lights. After half of my planes or more I discovered Shades (yes!), which made my life easier by aiding a lot with aligning and special colouring.
Will continue in part 2... soon.
Thursday, May 13, 2010
Blender basics III: Advanced Modelling - Loop Subdivision
In this chapter I will explain what is a loop subdivision, how to apply it to a mesh (dividing / splitting the mesh), and how to select and move these edge rings.
Loop Subdivision (Edge Rings)
What is a loop subdivision? A loop subdivision is a group of edges that splits the whole mesh in two parts; it must split a whole group of ortogonal edges, otherwise it would be a simple edge division.
 Figure 1: Mesh split by X, Y and Z axis
A loop subdivision can be created by pressing 'R' key while holding 'Control' (that is, Ctrl+R). Once pressed the hotkey, a magenta line will appear in the model as a preview of where the edge ring will be created (see Figure 1). By moving the mouse through the mesh, we can see the different edge rings that can be created, accepting the desired one by pressing the left mouse button.
Then the edge ring preview will be fixed in the selected section, but we can move the edge ring preview within the enabled section (see Figure 2, move along red arrows), which allows us to split the mesh not only by the middle section but in an asymetric-like mode.
 Figure 2: Fit the ring to the desired position
Once placed in the desired position, we can proceed with the loop subdivision by accepting with left mouse button. We can also create the edge ring in the middle position, by accepting with the middle mouse button instead.
So the process is:
And now what?
By using loop subdivision we can easily divide our meshes (most when working with symmetrical meshes, but also with asymmetric ones). But we can also select the whole ring with a single click when we later work with the mesh, by pressing the right mouse button while holding pressed the 'Alt' key (Alt + Right Click).
 Figure 3: Edge ring selection
This selection method allows us to select all the edges/faces/points of the loop subdivision with a single click, and thus allows us work much quicker with symmetrical meshes, but also helps to work quicker with any kind of mesh.
Multiple Subdivisions
If you want to create more than one ring at a time, it's possible by moving the mouse scroll wheel up/down just after pressing Ctrl+R (step 1). That will increase/decrease the number of simultaneous subdivisions to apply, and will be displayed in the preview.
 Figure 4: Multiple mesh subdivision
So loop subdivision is an easy, quick and very helpful tip that will allow us to work in a quicker and easier way with Blender. This is one of the many techniques that makes Blender much easier to use than we ever thought before. Happy blending!
Loop Subdivision (Edge Rings)
What is a loop subdivision? A loop subdivision is a group of edges that splits the whole mesh in two parts; it must split a whole group of ortogonal edges, otherwise it would be a simple edge division.
 Figure 1: Mesh split by X, Y and Z axis
A loop subdivision can be created by pressing 'R' key while holding 'Control' (that is, Ctrl+R). Once pressed the hotkey, a magenta line will appear in the model as a preview of where the edge ring will be created (see Figure 1). By moving the mouse through the mesh, we can see the different edge rings that can be created, accepting the desired one by pressing the left mouse button.
Then the edge ring preview will be fixed in the selected section, but we can move the edge ring preview within the enabled section (see Figure 2, move along red arrows), which allows us to split the mesh not only by the middle section but in an asymetric-like mode.
 Figure 2: Fit the ring to the desired position
Once placed in the desired position, we can proceed with the loop subdivision by accepting with left mouse button. We can also create the edge ring in the middle position, by accepting with the middle mouse button instead.
So the process is:
- Press Ctrl+R
- Move mouse to select the section to apply the loop subdivision (fig.1)
- Press left mouse button *
- Move mouse to fit the final position of the edge ring (fig.2)
- Press left mouse button *
And now what?
By using loop subdivision we can easily divide our meshes (most when working with symmetrical meshes, but also with asymmetric ones). But we can also select the whole ring with a single click when we later work with the mesh, by pressing the right mouse button while holding pressed the 'Alt' key (Alt + Right Click).
 Figure 3: Edge ring selection
This selection method allows us to select all the edges/faces/points of the loop subdivision with a single click, and thus allows us work much quicker with symmetrical meshes, but also helps to work quicker with any kind of mesh.
Multiple Subdivisions
If you want to create more than one ring at a time, it's possible by moving the mouse scroll wheel up/down just after pressing Ctrl+R (step 1). That will increase/decrease the number of simultaneous subdivisions to apply, and will be displayed in the preview.
 Figure 4: Multiple mesh subdivision
So loop subdivision is an easy, quick and very helpful tip that will allow us to work in a quicker and easier way with Blender. This is one of the many techniques that makes Blender much easier to use than we ever thought before. Happy blending!
Wednesday, April 28, 2010
Blender basics II: Basic Modelling
In this second chapter I will explain the most basic operations we can apply to meshes, vertexs, edges and faces. These operations will allow us to give the model the shape that we want.
Grab
The first operation we will see is the grab operation. It allows us to move a mesh in object mode, or a vertex/edge/face in edit mode.
After the axis key, you can also enter a number to move the object by an exact amount of units.
Scale
The second operation we will see is the scale operation. It allows us to resize a mesh in object mode, or a vertex/edge/face in edit mode, taking as reference the current cursor position (if you don't change it, it will be the "middle" of the object). This works in a very similar way than the grab operation.
The third and last operation we will see is the rotate operation. It allows us to rotate a mesh in object mode, or a vertex/edge/face in edit mode, around the current cursor position (if you don't change it, it will be the "middle" of the object). This works in a very similar way than the grab and scale operations.
Grab
The first operation we will see is the grab operation. It allows us to move a mesh in object mode, or a vertex/edge/face in edit mode.
- Object mode: Select an object and press "g". The object will enter in grab mode, and can be moved by moving the mouse around the 3D view window.
- Edit mode: Select a vertex/edge/face and press "g". The selected item will enter in grab mode, and only that vertex/edge/face will be moved, modifying the surrounding edges and faces.
- In both modes, press left mouse button (or enter) to accept the new position and exit grab mode, or right mouse button (or escape) to exit grab mode without saving changes.
- Select an element in object or edit mode.
- Press "g" to enter grab mode.
- Press "x" to force the grab mode along the X Axis.
- Move the mouse around to see how the object moves.
After the axis key, you can also enter a number to move the object by an exact amount of units.
Scale
The second operation we will see is the scale operation. It allows us to resize a mesh in object mode, or a vertex/edge/face in edit mode, taking as reference the current cursor position (if you don't change it, it will be the "middle" of the object). This works in a very similar way than the grab operation.
- Free scale: Select element, press "s" key to enter scale mode, and move the mouse around to see the scaling effect.
- Fixed axis scale: Select element, press "s" key to enter scale mode, press an axis key ("x", "y" or "z"), and move the mouse along the axis to see the scaling effect.
- Fixed axis and amount scale: Select element, press "s" key to enter scale mode, press an axis key ("x", "y" or "z"), and enter a number to scale the element along the selected axis for the selected amount.
- To exit scale mode, press left mouse button (or enter) to accept changes, or press right mouse button (or escape) to cancel changes.
The third and last operation we will see is the rotate operation. It allows us to rotate a mesh in object mode, or a vertex/edge/face in edit mode, around the current cursor position (if you don't change it, it will be the "middle" of the object). This works in a very similar way than the grab and scale operations.
- Free rotate: Select element, press "r" key to enter rotate mode, and move the mouse around to see the rotation effect.
- Fixed axis rotate: Select element, press "r" key to enter rotate mode, press an axis key ("x", "y" or "z"), and move the mouse around to see the rotation effect over the selected axis.
- Fixed axis and amount rotate: Select element, press "r" key to enter rotate mode, press an axis key ("x", "y" or "z"), and enter a number of degrees to rotate the element along the selected axis for the selected number of degrees.
- To exit rotate mode, press left mouse button (or enter) to accept changes, or press right mouse button (or escape) to cancel changes.
Monday, April 26, 2010
Blender basics I: Introduction
This is the first of five Blender articles I'm writing for Simutrans painters. I will explain here the main concepts and the most basic things you can find in Blender. If you still don't have Blender installed, get it here.
Just after opening Blender you get this in your screen: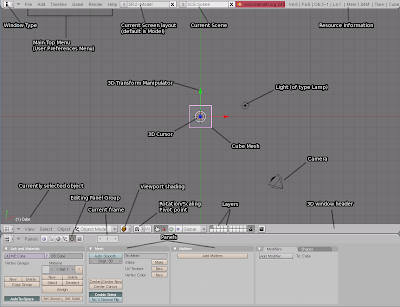 That's Blender's interface, but don't worry: there are only a couple of things to know about in there. The first thing you need to know is how to use the windows system of Blender:






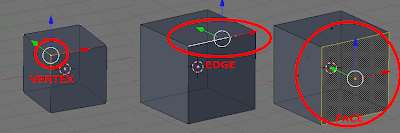 Now you have seen the object basis, and how to enter in Edit Mode. You will only be able to modify an object's vertex, edges and faces while in Edit Mode, not in Object Mode.
Now let's make a final summary. These are the things you should learn and remember:
Just after opening Blender you get this in your screen:
 That's Blender's interface, but don't worry: there are only a couple of things to know about in there. The first thing you need to know is how to use the windows system of Blender:
- This is the 3D view window. You can switch the current view by pressing the lower left corner icon and selecting the desired view, but you shouldn't care about it right now.

- Below there is the buttons window, which will always show you the available options for the current job.
- You can right click on a border side and select split to split a window in two: right click on a side (left,right) border to split the window horizontally, or right click the up/down border to split the window vertically.

- The cube you see in the middle is the default mesh (3D object) that Blender creates for you when starting a new model. Later on you will be able to add more meshes.
- Pressing the middle mouse button (scroll wheel) and moving the mouse around without releasing it will rotate your point of view around the mesh. Move it slowly so you can easily understand the effect.
- Now repeat the operation (middle button dragging) while pressing the Shift key: that will move (not rotate, note the difference) your point of view along an axis.
- Note the blue, red and green lines in the window (also the arrows). These are the space axis: the red one is the X axis, the green one is the Y axis, and the blue one is the Z axis. You can think of «length» for X, «width» for Y, and «height» for the Z axis if you feel more comfortable with those.
- Press the TAB key: that will activate the Edit Mode. Press TAB key again to return to Object Mode.


- While in edit mode you can change the selection method by clicking the buttons (see picture) or by hitting Ctrl+TAB and selecting the option in the menu. You can change between vertex, edge and face selection method. These are the three ways you will use to modify an object from now on, so keep them in mind.


- If you aren't in Edit Mode hit TAB to enter Edit Mode. Now press the vertex selection method button. Left click on a vertex to select it. Shift+Click to select multiple vertex. Now press the edge selection method button, and select one and multiple edges. Do the same for faces.
 Now you have seen the object basis, and how to enter in Edit Mode. You will only be able to modify an object's vertex, edges and faces while in Edit Mode, not in Object Mode.
- Now hit Space and select Add, Mesh and Cube. A second cube will be added to the 3D view window.
- To delete an object, right click it in Object Mode and press Del.
- Now try to delete all cubes if you have any, and add a Cilynder by hitting Space and selecting Add, Mesh and Cilynder. Now repeat this tutorial with the cilynder.
Now let's make a final summary. These are the things you should learn and remember:
- Windows: what is the 3D window and how to split windows.
- 3D view: how to navigate through the 3D view window.
- Edit Mode: how to enter Edit Mode and what it is.
- Selection methods: which elements of an object you can deal with: vertexs, edges and faces.
- Meshes: Adding and removing objects to your 3D view window.
Blender and Simutrans
 Blender is an open source 3D modelling software that I use to make graphics for Simutrans. This software allows you to build a 3D model, apply textures to it, and render images, which means taking pictures of the model.
Using a 3D software to make graphics for Simutrans has cons and pros. I will analyze them, despite as I've never painted using pixel-art techniques I can't guess many advantadges it may have over 3D software. Comments, advice and suggestions about both techniques will be appreciated.
Cons. There are mainly two reasons to not use 3D software:
- You need to learn how to use a complex tool.
- You need to practice/learn a different workflow for making graphics.
Pros. I can see many of them, some quite cool:
- You can make basic changes to the model (e.g. rescaling) with relative ease.
- You can easily re-use previous work (e.g., for different freights, even for other similar vehicles).
- Models can be used for different paks, or shared with other paks' painters.
- Lot of work can be automated (techniques, rendering, colouring...).
- You work on a single 3D model, no matter the number of views needed.

In my oppinion, I understand those people who don't want to use 3D software due the difficulty on learning the new software. Actually I think it's not as difficult as it looks like, but I must admit it's not easy at all. By the way, I keep learning some basic techniques I didn't know after two years of using Blender!
The difficulty of learning how to use Blender is one of the reasons that encourages me to write this article and the ones that will folow. I'll try to build a collection of articles about small tricks, techniques and other short tutorials that can teach other people to use Blender step by step, based on small chapters that are easy to read and learn, with the intention of making easier to learn the whole.
So stay tuned, because I will write very soon the first chapter about Blender. It will be a very simple introduction to what is Blender and how does it look like.
Subscribe to:
Posts (Atom)
